
As a researcher, your surveys may be designed to gather information from a specific audience (panel), based on demographic or behavioral characteristics. For example, you may want to target a specific group based on age, gender, location, marital status, or job function. When you don’t have direct access to your target audience, you can outsource the respondent fielding to a third-party panel (also called “sample”) vendor.
By requesting and purchasing a panel, you will be able to specify exactly which target audience to which you would like your survey to be distributed. The panel vendor will distribute your survey to the appropriate group of people.
CheckMarket has integrated technology from one of our trusted panel vendors so that you can create your survey, specify your target audience, and agree to purchase those completed survey responses directly within the CheckMarket platform. This process will enable you to quickly distribute your survey to your target group while avoiding the time-consuming back-and-forth interactions that are usually required to distribute your surveys to panels.
Note: Only users with Billing Administrator permissions have the authority to purchase a panel. Users without Billing Administrator permissions can create panels and save them to their drafts, but only a Billing Administrator can authorize the purchase of the panel, thereby moving the panel from draft to purchased state
Terminology
- Panel (Sample) — Also known as “sample,” this refers to the intended audience that you would like to complete your survey. A panel is comprised of a specified number of survey responses.
- Length of Interview (LOI) — Amount of time (in minutes) it will take the participant to complete the survey.
- Incidence Rate (IR) — Also known as “Qualification Rate”, this is the percentage of people in a sample, or the number of people to which the study was sent that qualify for a study. Learn more about Incidence Rate here. There are two types of IR:
- Predicted IR is the anticipated percentage of respondents that are likely to qualify for a study based on the screening criteria. The predicted IR often fluctuates throughout the field time and helps anticipate how many respondents the study should be sent to before and during the study.
- Actual IR is the actual number of respondents that qualified for the study based on the final number of respondents to which the study was sent.
- Complete — A survey complete is equivalent to a survey response. For each survey participant who completes your survey and is not screened out, this is considered a “complete.”
- Cost Per Incidence (CPI) — How much it costs per complete (survey response). This value is calculated based on the qualifying rate (IR) of participants as well as your survey length (LOI). The CPI will be estimated based on the IR and LOI you provide upfront. If the IR and LOI are accurate, your estimate will not change. However, our vendor will keep track of the actual IR and LOI throughout the fielding process; if the actual IR and/or LOI are different than the values that were initially estimated, the CPI will change based on the actual IR and LOI values.
Requesting a CheckMarket survey panel using the panel tool
- Create a survey in CheckMarket.
- Select Distribute from the survey menu options.
- Select Add / Remove channel.
- Select the channel Targeted panels. Then click Save.
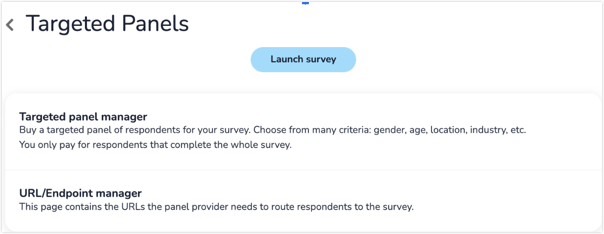
- Select Targeted panel manager.
- On the Targeted panel manager page, toggle between viewing your Draft Panels and your Purchased Panels. By default, you will be viewing your Draft Panels. Click Create new.
- In the side pane, create your new targeted panel. Enter your basic survey information, any targeting demographics, and specify whether your survey includes additional screening questions. You will also be able to view your estimated project total and enter a maximum CPI that you would agree to pay. See below for more detailed information about the sections on this page.
- Click Save. Your project panel will be added to the list of Draft Panels.
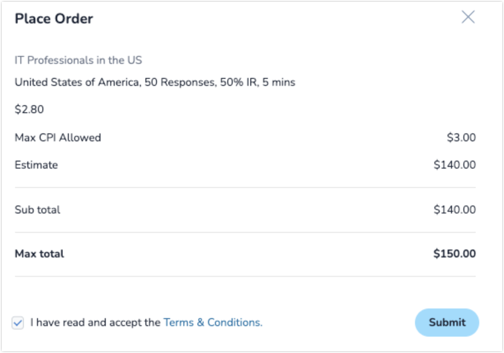
- On the Draft Panels page, select the checkboxes located in the left-hand side of each row to select one or multiple panels that you would like to purchase. Once you have selected all panels you want to purchase, click Place Order.
- Click the link to read the Terms & Conditions, check the box indicating that you have read and accept the terms, then click Submit. Your panels have been purchased, and request has been sent to the vendor for review. Note: You will receive an invoice for your panel purchase upon project completion. You can now view your purchased panels in the Purchased Panels table within the Targeted panel manager.
- To launch your survey, go to the Distribute section of your survey and click Launch survey. At this point, our panel vendor Prodege will distribute your survey to your intended audience.
- Once your survey is live, use the Purchased Panels table within the Targeted panel manager to track the status of your survey panels.
- At this point, we have automatically created a unique survey URL and associated our panel vendor’s endpoints for Completes, Terminates, and Overquotas; so no further action is needed on your end. Also, we have automatically created survey quotas based on any gender balancing and age balancing you have set up in your panel(s).
Panel details
Basic Info
Panel Name
You must give your panel a name. CheckMarket recommends that you include a specific name, as this panel name will be referred to on your invoice as well.
Survey Length (LOI)
How many minutes do you expect it to take for a survey participant to complete your survey? Enter your best estimate of your survey length (also called Length of Interview or LOI) in minutes. It is important to provide an accurate estimate of the LOI as this is used to estimate and calculate the cost per incident. If you think it will take your survey participants five minutes to complete your survey but it actually takes them closer to 10 or 20 minutes, your project cost might increase in order to achieve your desired number of survey completes (responses).
Country
Which country do you want to target for this specific panel? Select a country from the dropdown to select your target audience. Each panel is specific to a country. If you would like to distribute your survey to multiple countries, create a new targeted panel from the Draft Panels table on the Targeted Panel Manager page. You can distribute your single survey to multiple countries as long as you have created one panel per country.
Responses Required
Enter the number of completes (responses) that you would like to receive from this particular country. You will only be charged for completed responses and not for survey participants who have been screened out of your survey.
Demographics
Gender & Gender Balancing
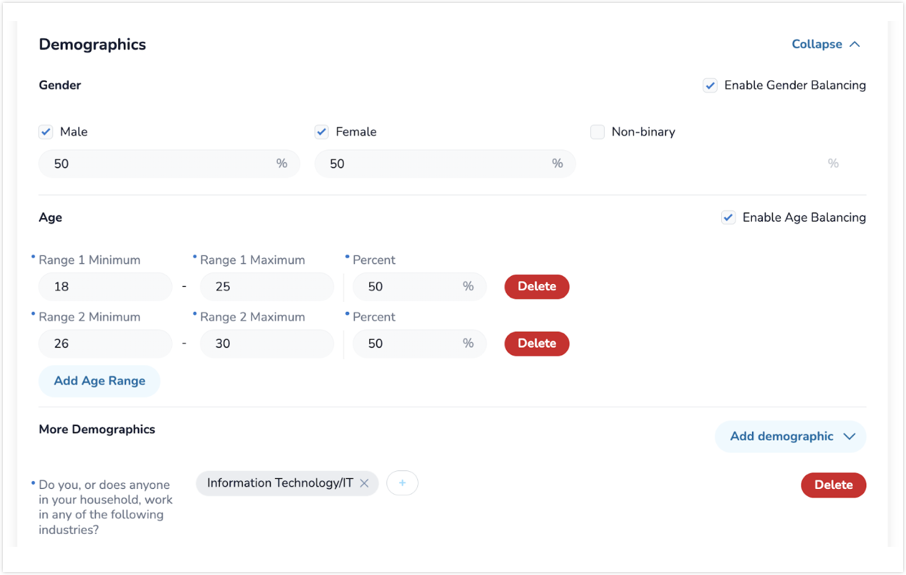
One of the most common targeting criteria for market research studies is the participant’s gender. Select whether you would like to target one or more specific genders.
If you want to ensure that you target a particular percentage of gender buckets, select the Enable Gender Balancing checkbox. You will then be able to enter a percentage value to determine the breakdown of responses by gender that you would like to capture.
If you have set up Gender Balancing within your panel, we will automatically create corresponding gender quotas within the survey upon launching the survey to your panel.
Age & Age Balancing
Another of the most common targeting criteria for market research studies is the participant’s age. Select whether you would like to target a particular age or age group by entering age values in the maximum and minimum fields. To add another age range, click Add Age Range and make sure there is no overlap between your various age ranges.
If you want to place quotas on your various age ranges, click select the Enable Gender Balancing checkbox. You will then be able to enter a percentage value to determine the breakdown of responses by age range that you would like to capture. Similar to Gender Balancing, we will automatically create corresponding quotas based on the Age Balancing criteria you have indicated in your purchased panel(s) for your survey.
If you have enabled gender balancing and age balancing, nested quotas will be created based on your entries. For example, if you requested 50% male and 50% female and also requested age ranges of 50% age 18-24, 50% age 25-30, your quotas will look like this:
- 25% males age 18-24
- 25% females age 18-24
- 25% males age 25-30
- 25% females age 25-30
More Demographics
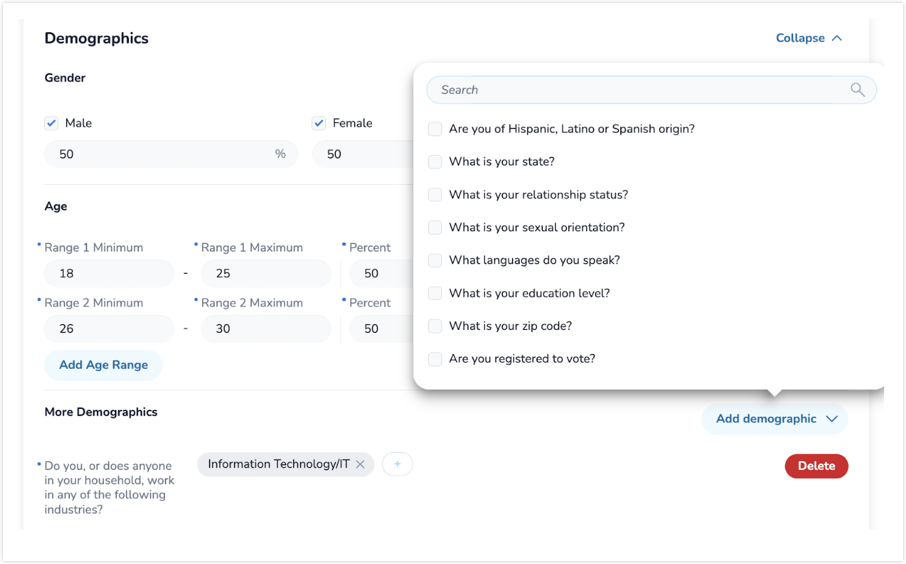
To select additional targeting demographics, click Add Demographic to search for the list of available targeting attributes from our vendor. Select the checkbox next to each targeting attribute that you would like to include in your sample audience.
Each country has its own extensive set of demographic criteria that is available to choose from. These are pulled directly from our panel vendor’s set of demographics. Some examples of the most popular demographic targeting criteria include the following:
- Postal Code (varies by country)
- Employment Status
- Professional Industry
- Company Department
- Job Title
- Household Income (varies by country)
- Marital Status
- Education Level (varies by country)
- Age/Gender of Children in Household
- Race (varies by country)
- Place of Residence
Additional Screening Options
If you are unable to find all of the specific criteria you need within the tool, you can set up additional screening questions within your survey to disqualify participants based on self-reported (within the survey) criteria. This way, you can target a more specific audience. At this point in the panel request, you should specify whether you have set up any of these additional screening questions in your survey. If so, you must ensure that you update your best estimate for your Incidence Rate (IR); otherwise, your overall panel project estimate could be inaccurate. If you have not set up additional screening questions in your survey, you can assume that the IR will be close to 100%, as our panel vendor knows exactly which audience you are wishing to target.
To add an additional screening question, open your CheckMarket survey, add a question to the beginning of your survey (multiple choice is recommended), and add branching logic to disqualify the respondent if they select a certain answer choice.
Incidence Rate (IR)
The Incidence Rate (IR) is also known as the Qualification Rate. The IR is reflected as a percentage of your overall survey participants. A way to understand the IR is to ask yourself “If this survey was sent out based on the demographic information I selected (including country, age, gender, and any other demographic attributes), what percentage of these people would qualify for the survey based on any additional screening questions or quotas I have set up in the survey itself?”
Similar to the LOI, it is important to provide an accurate estimate of the IR, as it is used to estimate and calculate the cost per incident. If you think that 90% of your survey participants will qualify for the study but the actual qualification rate ends up closer to 50%, your project cost will increase to achieve your desired number of survey completes (responses).
Learn more about Incidence Rate here.
Estimates and Maximum Cost
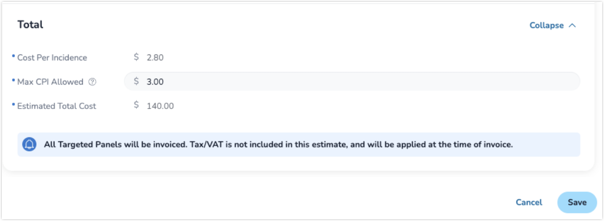
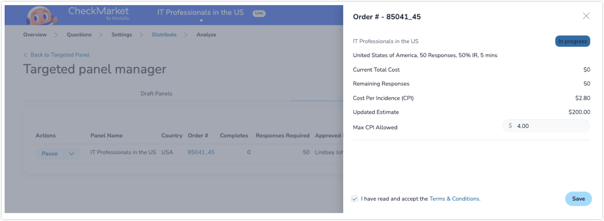
In the “Total” section, you can view your estimate, set the maximum cost, and see the estimated Cost Per Incidence (CPI) as well as the Estimated Total Cost for this specific panel project. See the following for additional information:
- The estimated Cost Per Incidence (CPI) refers to the estimated cost per survey response (or complete) provided by our panel vendor. This number is calculated based on the estimates you provide for both Incidence Rate (IR) and Length of Survey/Interview (LOI). The more accurate your IR and LOI, the more accurate your CPI estimate will be.
- The Estimated Total Cost refers to the overall cost of your project, calculated based on the Cost Per Incident (CPI) multiplied by the number of responses you require. Because the accuracy of the CPI is dependent on the accuracy of your Incidence Rate (IR) and Length of Survey/Interview (LOI) estimates, this number is subject to change. CheckMarket will not charge you more than the estimated total cost, unless a Maximum CPI has been set; therefore, your maximum project cost is greater than your estimated total cost (view the Terms of Use for more specific information on this). Note: Tax/VAT is not included in this estimate and will be applied at the time of invoice.
Based on the variable nature of panel fielding and potential discrepancies in your IR and LOI versus the actual IR and the actual LOI, the total cost of the panel may vary from the estimate provided to you (as well as the estimated CPI). To ensure that your project incurs the requested number of completes without the risk of fielding interruptions, you have the option to enter a Maximum Cost Allowed.
- The Maximum CPI represents the maximum cost you would agree to pay per complete (response) for your sample. Entering a higher Maximum CPI than the originally quoted price will help to ensure you reach the desired number of completes even if the actual price varies from the original estimate (e.g., if the CPI increases during fielding). CheckMarket will automatically pause the project once the actual CPI reaches the number you enter into the Maximum CPI field. If you leave this field blank, CheckMarket will consider the initially estimated CPI as your Maximum CPI allowed.
During fielding, if you notice that your actual CPI is approaching the Max CPI and you want to ensure your project will not be paused, or if your project has already been paused due to the actual CPI exceeding the original CPI, you can increase the Maximum CPI for a specific panel project. You can do so by navigating to the Purchased Panels page within the Targeted Panel Manager and clicking the Order Number link for the panel project you need to edit. When you adjust (increase) your Maximum CPI, you will have to re-agree to the Terms & Conditions to confirm your adjusted purchase agreement.
Purchasing panels and launching surveys
Once you have created the panels to which you want to distribute your survey, you can navigate to the Draft Panels page within the Targeted Panel Manager. Select the checkbox for each of the panels to which you want to purchase and distribute. Click Place Order to see a detailed breakdown of each of your panels that you intend to purchase. Read through the Terms & Conditions carefully, then check the box indicating that you have read and accept the terms. Then click Submit to purchase your panels By clicking Submit, you have agreed to be invoiced at the conclusion of your project. Now your survey is ready to be launched to your desired audience. Once your survey is live, it will begin fielding responses from your panelists! As stated in the Terms & Conditions, you will receive your invoice once all panels within a given invoice/order have been completed, have ended, or have expired.
See Monitoring your survey panel for information about the Purchased Panels table, where you can monitor your panels in the Targeted Panel Manager.
For more information, contact our Sales Team.




Leave a Reply